Showing posts with label paws. Show all posts

Thursday, March 28, 2013

Got A lot Done

Joanne suggested wrapping the neck with felt because you wouldn't need a lot of stuffing here then. You do want this area to move though.
Now it's all about getting everything the right size/length/placement.  
This is what Joanne says about the spine: "The spine goes almost all the way down, I stop maybe an inch from where he is sitting on his butt.  If it is too long it will poke out there right where the bottom curves in.  I have found when I stitch in the spine that I do not stitch the last inch or so."

The top edge of the body is fray checked and hemmed. 
Back to legs, these are the back legs, I checked the length of the Lockline making sure it didn't go all the way to the tip of the toe. It then gets wrapped with felt and stitched to secure. 
It's all a testing game now, lots of stuffing, unstuffing, pinning, unpinning and moving limbs over a smig.
I think I've got it.
Feet aren't splaying! 
Now time to fix the length on this spine like Joanne suggested.
Still lots of fiddling to do, the arms will be a challenge.

Monday, March 25, 2013

Starting the Bear Armature

I will not explain Lockline armature, I learned all about it from Joanne Livingston and you can too: http://desertmountainbear.blogspot.com/2012/11/ordering-armature.html

I will show you what Joanne showed me... how to use Lockline in your bear. These are her tried and true techniques. I noticed that I'm actually wiring this opposite to the way Joanne does it so you should look at her post below also if you are having trouble following.
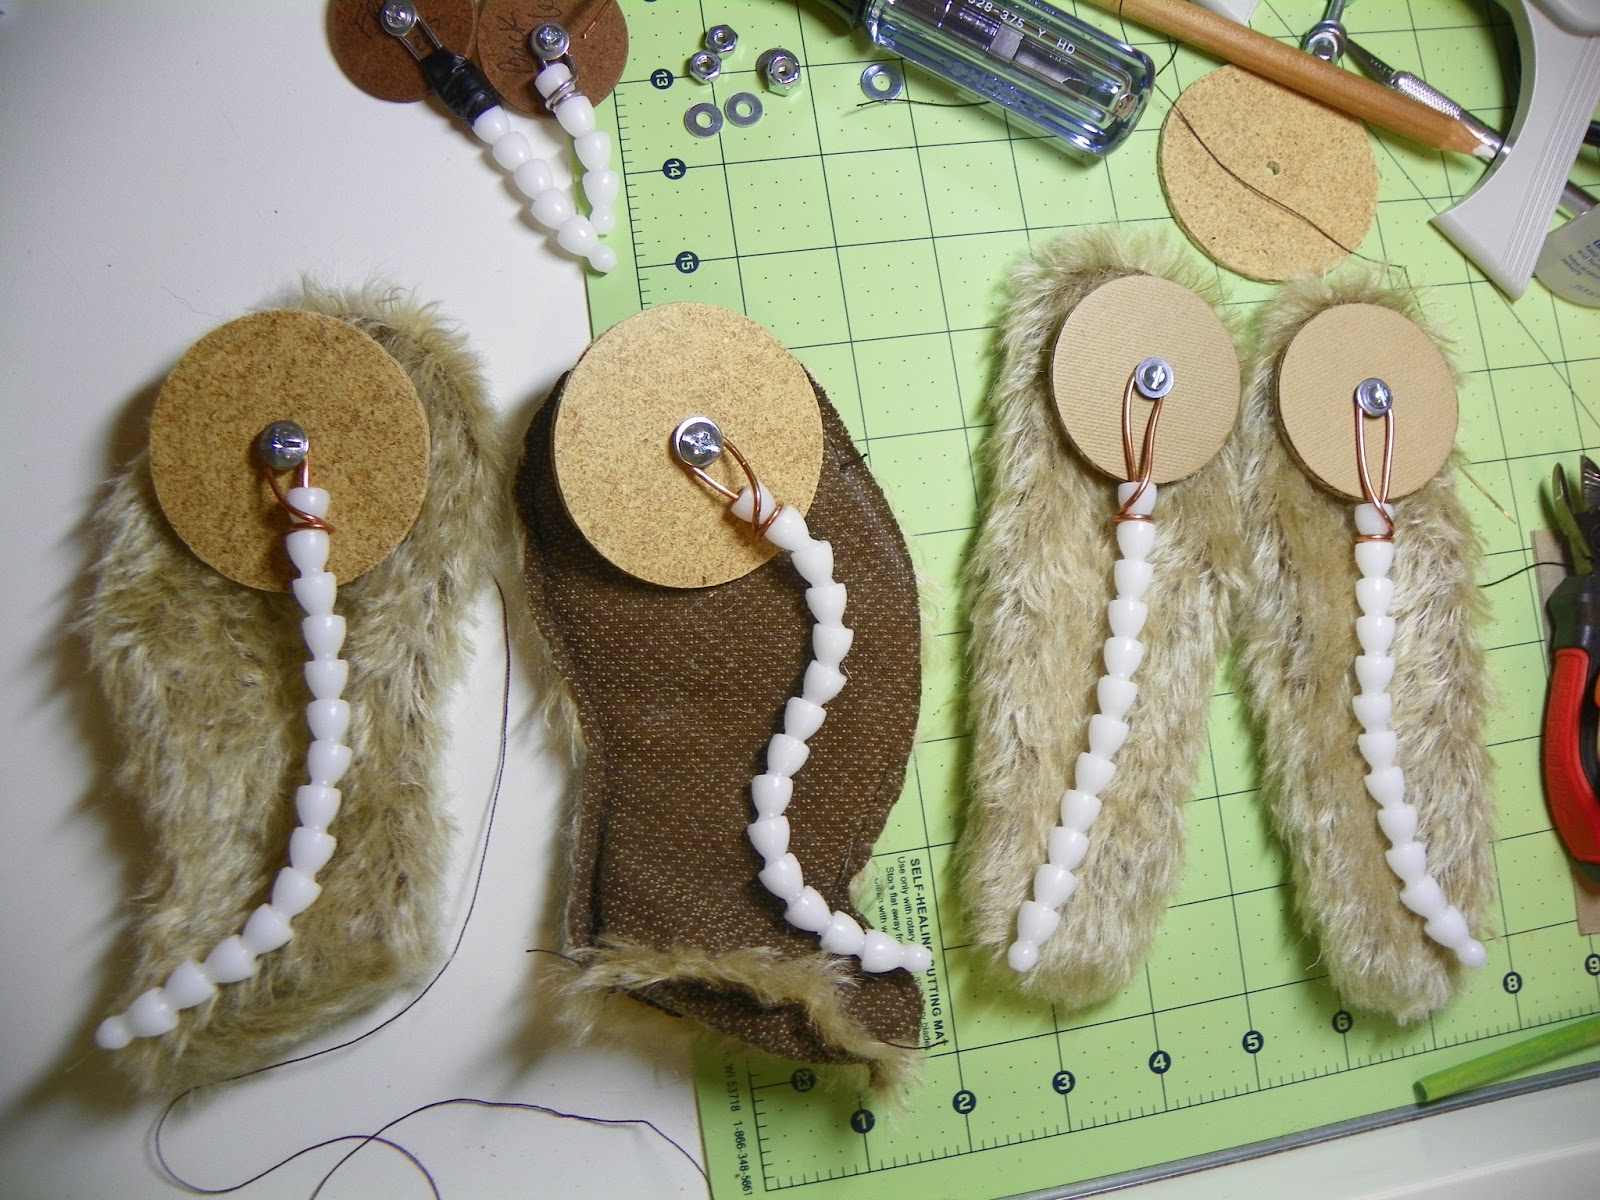
This is my 2" arm disk and #6 nuts&screws. I measured a tad long on my Lockline but can pop pieces off later.


The Lockline in the arms sits at the edge of the disk so that this joint lays flat.
I'll show you how they get taped up with electrical tape after Joanne gives approval.
These are my 2 1/2" disks and #8 nuts&screws. The leg gets wired the same except the Lockline sits on the disk for higher movement in the leg.
2 arms and 2 legs waiting for tape.
Here's my question of the day, the leg on the right I've positioned to the front with the Lockline curving with the leg and back into the foot. The leg on the left goes straight down with a curve into the foot. I'm thinking the Lockline does what it wants inside the leg so should just come straight down but I wasn't sure. I know the Lockline maybe long, I'll fix it when I wrap and test postion.

Looking at the post Lockline Again below kinda answers the above question towards the end of the post.

In the post below Joanne explains her process:

http://desertmountainbear.blogspot.com/2010/07/lockline-again.html

Sunday, March 24, 2013

A Quick Leg Fix

Yesterday I began disk joint fitting and asked Joanne Livingston to advise me on this.
These where her instructions, to use the smaller 2 1/2" disks in the back legs and to nip this top bit off to make it fit better and to bend the leg more.
I got out my chalk pencil and rounded this front part.
One done, I'll finish the second this afternoon.

Looks great now Joanne, thanks!

The below post on Joanne's blog will help explain the placement of the leg further.

http://desertmountainbear.blogspot.com/2011/11/little-more-explanation-needed.html

Saturday, March 23, 2013

Bear Materials List

I'm still on track for making a realistic bear with Joanne Livingston's guidance. Many of these items I've never used before and I'm excited to learn how!!! I'll show you what we're doing with them as we go along and I'm sure there will be other things to add later.

Let's see if I remembered everything starting at the top left: pattern, marking pen or chalk, material(mohair), scissors, pins&needles, thread and fabric check. At the top right is a bag of wool I'll use for stuffing.

At the bottom left: hardboard disks, lockline, screw driver and nut or lock nut drivers. I use either #6 or #8 nuts and screws, wire cutters and pliers, wire gauge 16(here I have copper I'll see if it works), electrical tape. Oh and I forgot sheet felt for wrapping the lockline.

At the bottom right: clay epoxy for the nails and inserting wire in the eyes, taxidermy eyes, pig skin for paw pads.

This picture is for Joanne to look at so she can advise me on the right size disks!

Below is Joanne's material list:

http://www.desertmountainbear.com/p/materials-used.html

Wednesday, March 20, 2013

Furry Foot Bottom

This time around I actually made a pattern for the bottom of bear's foot. I did it so the 2 feet were the same, which for me can be a challenge. Here is a link to a past post on fashioning bottoms of bear feet:  http://www.karenmakesstuff.com/2010/01/felt-feet.html
These will not be felt or leather bottoms, they need to be furry. Joanne will instruct me on how to sew leather paddy paws to this bear. This is a link to one of her bear's paws, you need a furry bottom so you'll have fur between his pads: http://www.flickr.com/photos/desertmountainbear/6913387897/in/set-72157629410488909

Thursday, October 6, 2011

She Needs A Name

 I finished her paws this morning.

 She likes being a girl.

She also enjoyed the fresh air.
Oh and like I said, I haven't named her yet. I almost named her after my mother but I wouldn't be able to give her away then. I'm still working on her dress.

Monday, January 25, 2010

Claws

This is what it looks like on your bear!How about a foot?
Three toes are good.