Showing posts with label 3rd Annual Artist Doll and Teddy Bear Convention. Show all posts

Saturday, May 4, 2013

My Spirit Soars

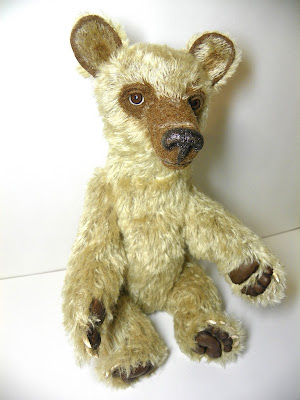
Two months of work has paid off! Spirit is finished with the help of Joanne Livingston. In fact I never would have tried this project without her help and encouragement. 


Spirit with one of Joanne's Reproduction Bears Stella.
I'm the happiest bear owner!!!

Please feel free to ask any questions you might have!

From Admirer to Maker of Realistic Bears

Joanne Livingston pulling the toes on Spirit.
Three years ago the thought of making a jointed teddy bear seemed unlikely. Today with lots of generous help and encouragement I've gone beyond that. If you want to meet the best people start crafting!!!

Joanne holding Spirit after showing me some of her techniques.
This is Joanne's hotel room at the...

Artist Doll & Teddy Bear Convention

presented by the
Susan Quinlan Doll & Teddy Bear Museum
Clarion Airport Hotel
Philadelphia, PA • May 2-4, 2013

Joanne gave me some of her time on Thursday to help with finishing touches on Spirit. She had been consulting with me on this project since the beginning of March.

These are Joanne's bears that I made sure I picked up!
Joanne loves black bears and particularly a bear named Hope. She has used Hope as a model for most of her bears.

My initials on the left and Joanne's on the right. 
I'll never be able to really thank Joanne for helping me make Spirit and for being a wonderful blog friend. What I will recommend to people reading this post is to live generously. You'll find that you and the people around you will enjoy and live life more.

My brood.
Next post... Spirit!


Wednesday, April 17, 2013

Teddy Bear Convention May 2nd - 4th

Be there or be square: http://www.quinlanmuseum.com/convention.html


Artist Doll & Teddy Bear Convention

presented by the
Susan Quinlan Doll & Teddy Bear Museum
Clarion Airport Hotel
Philadelphia, PA • May 2-4, 2013
Optional Workshops: Thursday 8a.m.-5p.m.
Convention: Thursday 5:30p.m. to Saturday 9p.m


This is my last bear post until after the convention at which time I will show you how Joanne Livingston assisted me in finishing bear.

Bear's nose needs work, back paws need toes pulled and claws need to be inserted. I also need consultation on facial details.

And for those of you who are bored of bears, Prince William kept me company the whole time I've worked.
Not that Princess Skittles was happy about that. Don't lord it over her William...
cause she'll get you back when you're not looking!

Saturday, April 13, 2013

Little Here Little There

Still working on the nose building up layers of Mod Podge. This will be sanded later to make it smooth.
I still have quite a bit of hair rooting and pulling to do.
All this will make bear look like Spirit Bear.
http://www.adfg.alaska.gov/index.cfm?adfg=wildlifenews.view_article&articles_id=314
picture by Andrew Cremata

Below is what I'll be doing:

http://desertmountainbear.blogspot.com/2010/06/making-face.html

Thursday, April 11, 2013

Gettin There

I'll show you this side first because I've done more. I started rerooting hair into the brown spots.
Oh, you weren't here when I changed out the eyes. I'll put the scary eyelid pictures towards the end!
Bear's all sewn up to but no tail yet. Joanne will show you how to sew up the back: http://desertmountainbear.blogspot.com/2011/12/giving-bear-some-backbone.html
When I get insecure about whether bear's right or not I get a loud chorus in the background saying, "It's your first one!" Thank you family.

I want to get all the felting done on the face before I start Mod Podging the nose. I'd better get a move on because it's almost May and time for The 3rd Annual Artist Doll and Teddy Bear Convention in Philadelphia!!!

http://www.quinlanmuseum.com/convention/

Info if you are only attending Saturday:
http://www.quinlanmuseum.com/convention/saturday.html

Sunday, April 7, 2013

Needle Felted Face For Bear


It's in fear and trepidation that you begin needle felting a project like this. 
But once you begin you don't look back
I'm checking the placement of the eyes, most of the white will be covered by eye lids.
I love making noses. This nose will be doused in layers of watered down Mod Podge and sanded smooth.
So far so good!
Joanne has a great tutorial on needle felting a bear's face, you must check it out!

Thursday, April 4, 2013

Making Bear Claws

I can't believe I'm this far along. Today I'm making bear claws and adding wires to the taxidermy eyes I have for bear. I'm using a 2 part Apoxie(epoxy)clay that when perfectly blended should be bright white. I use the roll into a log and fold in half method of mixing.
Here's my bright white clay and one filled eye.
I left tabs on my wire to make it stay put and made a skinny eye hole at the top to receive thread and go through the fabric easier.
And this is how you make claws, I found this apoxie stickie so I only worked with a small amount at one time. I would have taken more pictures but I was getting clay on my camera. Roll it into skinny snakes and slice on an angle.

I must admit one thing to Joanne, in your post you mentioned putting a bend on your metal blade... oops! You can't do that with this type but it worked fine anyway.

http://desertmountainbear.blogspot.com/2009/09/pile-of-bear-claws.html
After being cut I rolled them between my fingers a little, chose which side would be my nail and gave it a little curve. They are drying nicely here. I tried to use up what I had made but a little goes a long way. So I made a little egg!

Wednesday, April 3, 2013

Pulling Toes Is Not Easy

Normally I first show you how I've copied one of Joanne's techniques but today I'm sending you to her blog first!
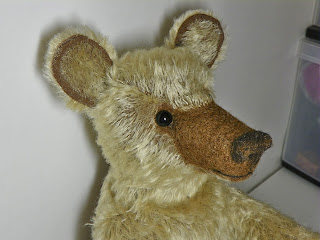
Above is one of my hand paws after "pulling". You may notice that it's not as well done as Joanne's. This technique is going to take some practice on my part and I'm also going to take advantage of some time spent working with her in May.
I'll show you how I'm preparing to do that, I'm working on the foot pads.
With thin leather and strong thread I've placed a knot behind the leather.
I've stitched the toe part leaving an opening.
Stuff & stitch.
Do the same with the bottom half.
I'll be very happy when Joanne shows me in person how to pull toes!
And in the mean time try to live with my beginners attempt.