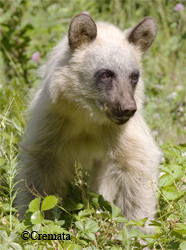
This is Spirit Bear and you can read about it here:
http://www.inhumane.org/data/THenricksen.htm and picture by
Andrew Cremata
This is the type of bear I am attempting to make.
I've already begun on some detailing and I thought I'd show you how it went.
If you take a look at Spirit's ears you'll notice the hair is short in the front and you can see it's brown skin around the edge.
The ear on the left needs to be done and the ear on the right is finished, well almost!
You'll need a small comb, scissors and the tweezers definitely.
The ear fits on my finger which make trimming easy.
Use the large teeth for this and just comb through once.
Start at the bottom...
this entire side is short so cut right against the comb.
Joanne will appreciate this because she had been a hairdresser!
All trimmed!
Remember that brown skin edge on Spirit bear? This is when we'll need the tweezers. Pluck a 1/8th" edge around but only on the trimmed side.
Good!
Here's where I took some liberty, on Spirit you don't see fur coming from the back of the ear but I chose to leave a short fringe around. That means some light trimming around the edge.
Next, I noticed the the brown rimmed edge needs to stand out more so...
I sewed a little running stitch 1/8th" in, only just catching the back of the ear.
You should notice the brown, on the ear on the right, is showing better.
Looks good but one more thing isn't right. These ears are puffy in the center and not cupping the right way. I shall take matters into my own hands!
Get out some fabric glue, ok I used felt glue. I fetched 4 tablespoons that were the same size as my ears. Here's what you'll do, put some glue all around the tip of a Q-tip, open the bottom of your ear,
lightly glue the inside but don't glue the bottom edge.
With the trimmed edge facing up put your ears like a sandwich between the tablespoons and clip together in the center. You want them gently held together not vice gripped!
I took them out before fully dried and allowed them to finish drying without the spoons.
Perfectly cupped!
Sewed on and looking good!
Hey Joanne, the ears were so easy to sew on following your darts!
This is where we are now then. It's time to start on the eyes, paws and nails. The below post explains how Joanne Livingston designed her realistic bear heads.
http://desertmountainbear.blogspot.com/2011/12/bear-heads-from-picture-to-fabric.html
I'm lovin this Joanne.